Friday, May 18, 2012

Sun dried tomato chicken

This is one of those recipes I found online and have made a million times now because it is just so good!            I originally found it here: on Everyday Paleo.


1 jar of julienne cut sun-dried tomatoes in oil
2 lbs boneless chicken breasts thawed (you could use thighs also, just don't cut them)
2 TBSP dried basil
8 cloves of garlic, sliced thin
Salt and pepper to taste

Preheat oven to 375 degrees

Cut breasts in half length wise and place in glass baking dish.
Sprinkle with Basil and salt and pepper to taste.
Sprinkle sliced garlic on top of each breast.
Pour jarred tomatoes allover chicken, including the oil. Spread the tomatoes as evenly as you can over the chicken.
Cover tightly with foil and bake covered for 15-20 minutes. (I find that 15 minutes works best for thinner breasts.)
After 15-20 minutes, remove foil and continue baking uncovered for 15 minutes.
Enjoy!

Breakdown:
Jar of tomatoes: $2.99
Chicken: $4.39 (I buy tyson all natural frozen chicken breasts, 2.25 lb bags)
Basil: $1.99
Garlic: $1.13 (pre-peeled, cheaper if you peel it yourself!)

Total cost: $10.50
Servings: About 6
Cost per serving: $1.75

Super cheap and really delicious meal!

Pin It!

Stuffed Acorn Squash


I made this dish up when I did a Whole30 a year ago. I searched online for recipes and never found one I liked (or that didn't contain cheese or bread crumbs!) 

What you need:

2-3 acorn squash 
1lb of ground meat (I used Italian sausage) 
Veggies of your choosing (spinach, kale, mushroom, onion, peppers etc.)

Preheat oven to 375 degrees.

Prepping and cooking the squash:

-Cut each squash in half from top to bottom and scoop out the insides.
-Slice a bit off the back side of the squash so it will sit flat and not roll around. Don't cut too deep or you'll make a hole in the inside of your bowl.
-Line a baking sheet with foil or parchment and spray with cooking spray or lightly grease with oil. Place each squash bowl-side up on the sheet. Make sure there is enough room and they are not crowded or they will not cook evenly. 
-Pour about 1/2 TBSP water into each squash, tent loosely with foil and bake in a 375 degree preheated oven for 30-45 minutes. (Until the squash is tender when pierced with a fork.)

While the squash cooks, prepare your filling:

-Cook ground meat, adding spices if your meat is not spiced already. You can add things like Salt, pepper, sage, oregano, italian seasoning, fennel etc.
-When your meat is almost done, add mushrooms and onions - if you plan to add them, then finish cooking the meat.
- Add greens such as spinach or kale at the end and continue cooking for a few more minutes until the greens are wilted. Set aside.

Assembling:

-When both your squash and meat mix are finished, carefully spoon meat mixture into the squash bowls Packing in as much as you can. 
-Return  the squash with filling into the oven for another 15-20 minutes. If your meat is starting to brown too much, tent loosely with foil to prevent burning.

Serve and enjoy! (I like to pair this with a nice light salad with home made balsamic vinaigrette.)

3 small acorn squash $3.10
Kale $0.89
Onion: $0.79
Italian Sausage $2.19

Total for 6 servings: $6.97
Total per serving: $1.16

Obviously this would cost more if you added mushrooms and did not have spices on hand to season your meat with. But even with possible added costs this is still an easy, budget-friendly meal!

Pin It!

Monday, May 7, 2012

Taco Pie


This is a comfort food that is easy to prepare and everyone will love. I make my own taco seasoning to avoid processed weird stuff in my food. I usually make a double or triple batch and keep it in a container on the counter so I have some around if I need it. It's super easy to make and way better for you than store-bought taco seasoning mixes.

Ingredients for Taco Pie:
I use this biscuit dough recipe. But I use Ghee instead of vegan butter spread. I also use honey instead of agave.
2.5 cups of almond flour
1/2 tsp sea salt
1/2 tsp baking soda
1/4 cup butter (or coconut oil)
2 eggs
1 TBSP agave (I used honey)

2lbs ground meat of choice
1-2 TBSP taco seasoning
1 can of diced tomatoes, undrained
Cheese (optional)
taco toppings! (lettuce, black olives, tomato, onion, avocado, sour cream, etc.)

Directions for biscuit mix:
In a medium bowl combine almond flour, salt and baking soda.
In a large bowl blend together butter, eggs and agave/honey.
Stir the dry ingredients into the wet until a nice dough forms, it will be sort of sticky.
Set aside.

Directions for taco pie:
Brown ground meat in a pan, when fully cooked add 1-2 TBSP taco seasoning, 1 can diced tomato and 1/2 can of water Mix well and cook until most of the liquid has evaporated and flavors are combined. Set aside.
Prepare biscuit mix per directions then flatten into a greased glass dish with wet hands (to prevent sticking). I sometimes use a square 9x9 dish for a thicker pie or a 11x13 dish for a thinner pie. Up to you. This time I made 1.5 batch of the biscuit mix and used a 9x13 pan.
Bake at 350 for about 10 minutes or until dough looks almost set.
Remove form oven and top with meat mixture and cheese if you are using cheese, then return to the oven for another 10-15 minutes or so, check occasionally. Remove when the pie reaches your preferred level one doneness.

Cut into squares and serve topped with taco toppings. Enjoy!

Price will vary based on what type of meat you use, what quality cheese you buy and how many toppings you purchase.

Almond flour: $5.69 (closeout price)
Ghee: $9.99 (13oz jar)
Salt: You should have this.
Honey: $5.00
Baking Soda: You should have this.
Eggs: $2.69/doz
Meat: $7.00
Tomatoes: $100
Taco seasoning: will vary
Cheese: $3.69
Toppings: $5.00

Makes 12 servings.
Total: $40.06 (Give or take this will vary a lot depending on what you choose to use for yours and what you already have in your pantry. For example I did not have to buy Ghee, taco seasoning spices or honey because I already had some. This dish only cost me $24.07 to make because I had most of the ingredients already.)
Per serving: $3.33 (Cost me $2.00 per serving)

If you've stocked up on kitchen essentials like spices, almond flour when you find it for a good price, Ghee, honey etc. You'll find the things you make are not as expensive because you already have half of what you need for the recipe. A lot of times you'll only need to buy the meat and veggie because you already have everything else!
Pin It!

Balsamic mustard chicken


I got this recipe from the Everyday Paleo site. They do a section once in a while by a college student who budgets her meals. When she posts, she does include prices for her ingredients, but I will add mine since prices vary depending on where you live.

The kids loved this chicken, it was super easy to make, took simple ingredients you probably already have on hand and it only took a few minutes to cook (but you need to plan ahead to properly marinade). Definitely check this one out when you're in need of something new!

What you need to feed 4-5 people:
4-5 boneless skinless chicken breasts (4.39)
1/2 cup balsamic vinegar (2.99 if you have to buy a new bottle)
1/2 cup olive oil (2.99 if you have to buy a new bottle)
6 cloves of garlic, minced (1.13 for a pack of pre-peeled cloves)
5 TBSP spicy brown mustard (or just plain dijon if that's all you have) (I had some already, but I would guess 2.00)
Salt and Pepper to taste

Prep:
Rinse the chicken breasts and slice each in half length-wise to create long tenders. season with salt and pepper to your liking. Place them in a large ziplock bag then add the balsamic, olive oil, mustard and garlic. Seal the bag and shake the chicken around to make sure it all gets nicely coated. Place the bag in the fridge for at least 3 hours, longer if you want or have the time.

Cooking the chicken:
We opted to grill ours for a few minutes per side. The original recipe calls for pan frying them, but I find my chicken dried out a lot that way which is why we chose to grill. if you want to pan fry them, just heat a frying pan on medium-high, drizzle a little coconut oil (the recipe calls for olive oil, but cooking with olive oil over high heat is a no-no, or so I have read, so use butter or coconut oil) Brown chicken on both sides, then turn the temp down to medium, add some marinade, cover with a lid and let the juices reduce down as the chicken finishes cooking.

Total cost for meal: $13.50 for 5 servings
Per person: $2.70 


Pin It!

Monday, April 30, 2012

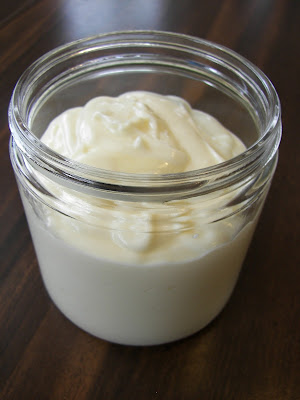
Home made mayo!


Many people think that eating healthy means giving up things like mayo, but it is simply not true!

Yes, the mayo you purchase at the store is horrible and full of weird chemicals and franken-foods you just don't want in your body. But you CAN make mayo yourself. Not only can you do it, but it is super easy!

Once you make mayo yourself for the first time, you will never buy it from the store again. Seriously, it takes less than 5 minutes to make mayo yourself.

The recipe I follow for making mayo I get from The Clothes Make The Girl.

Not only is the recipe available for free on her website, but it is also in her cook book, Well Fed, which I HIGHLY recommend to anyone doing a Whole30 or living the Primal / Paleo lifestyle.

What are you waiting for? Go make some mayo!

1 egg
1/4 cup plus 1 cup light olive oil (make sure you buy LIGHT olive oil because extra virgin will make your mayo very strongly flavored.)
2 TBSP lemon juice
1/2 tsp dry mustard
1/2 tsp salt

Blender OR Food processor. I always make mine in the food processor.

Directions:

Crack one egg into your blender or food processor. Add 2 TBSP lemon juice. Put the lid on your device and LET SIT for 30-60 minutes while the egg and lemon juice come to room temp. This is VERY important.

Once your egg and lemon juice have come to room temp, add in your 1/4 cup oil, mustard and salt, then whir together until well mixed, 20-30 seconds.

This next step will make or break your mayo.

VERY SLOWLY add in your remaining cup of oil while the mixture is whirling around in your food processor or blender. I am talking the smallest of drizzles here. A little more than dripping, but barely. Don't rush this and dump it all in at once, you will be mad at yourself! This step will take 2-3 minutes and work your triceps real good. (When I do this step I tend to get splattered a bit out the top hole of my food processor so I hold a napkin as a shield around the opening while drizzling in the oil. You may or may not experience this.)

If you've let your ingredients come to room temp and slowly drizzled your oil, you should have some well mixed fluffy mayo!

This mayo will stay good in the fridge for 1 week past the expiration date of your eggs.I made some about 2 weeks ago and it will be good until the first week of June. Plenty of time to eat it all!


Pin It!

Paleo banana pancakes


I have made these many many times and my kids LOVE them. They are so easy to make! And what I love is they are super simple, take only 3-4 ingredients (That you probably already have!) and they are super healthy. I also love that they don't have ANY almond flour or coconut flour etc. in them. Not that almond or coconut flour is bad, not at all - it can just be expensive, and when you're looking for a simple treat, like pancakes, it can take a lot of flour to make enough for everyone. So I love this recipe because it really is simple and it's really inexpensive to make.

When I make a single batch it makes about 4, but I usually double the batch (hello! I have 3 kids!) and I measure the batter into 2 TBSP piles, this gives me about 9 pancakes. I have not tried cooking these in a pan yet, but when I do I will let you know how they come out.  My 11 yr old loves to eat them plain, but my 7 yr old loves them cut up with pure maple syrup on top.

In case you need even more reasons to check them out, all you need for 1 batch is-
1 banana
1 egg
1/8 tsp baking soda
1 TBSP nut butter (optional)

Bowl
Fork
Spoon
Oven
Cookie sheet
Parchment paper

THAT'S IT! So go check them out already!!

How to make a single batch:
1.Preheat oven to 400 degrees
2.Mash 1 ripe banana in a bowl really well, add 1 tbsp nut butter, 1 egg and 1/8 tsp baking soda and mix well.
3.Spoon onto parchment lined baking sheet, about 2 TBSp of batter per circle, the batter will be pretty thin. (I found they tend to stick on some kinds of cookie sheets so you may want to spray the parchment with cooking spray or brush lightly with coconut oil).
4.Bake at 400 degrees for about 15 minutes or until golden brown.
5.Enjoy!


(I apologize for the poor photo. My kitchen isn't very bright, so it's hard to take great pictures when it's still dark outside.)
Pin It!

Hamburger helper

I've made this recipe once before and it turned out really good.  It felt like it was missing something, so after reading the reviews, I decided to add some allspice this time.

The format of this recipe on the original site isn't very user friendly - it is in paragraph form, so I will repost it here step by step. However, the original recipe is linked back at the top of this post. I also used ground bison instead of lamb.


1 lb ground beef
1lb ground lamb
1/2 onion chopped
1-2 cloves crushed garlic
1/2 cup beef stock
can of coconut milk
TBSP thai massaman curry
chopped carrots
1/2 large sweet potato chopped
2 tsp allspice (I added)
Frozen chopped spinach (I added)


Cook meat on medium low with 1/2 onion and clove or two of garlic.
Drain fat (If you want to, I did not).
Add beef stock to meat/onion mixture, can of coconut milk and a TBSP of thai massaman curry plus a couple chopped carrots and a large chopped potato. (Add additional spices of your choosing now)
Cover and simmer until veggies are soft.
About 10 minutes before serving toss in some frozen chopped spinach and stir to combine.
Serve and enjoy!

Your cost for this dish will really vary depending on what kind of meat you purchase. I already had some meat in the freezer. I think the bison was about $7 per 12oz (yikes!) and the organic beef was about $4 for 12oz The meat is going to be the bulk of your cost. Also you'll need to buy curry paste if you don't already have some. The veggies will be pretty cheap and you probably already have coconut milk in your pantry. This is one of those dishes that once you get the curry paste, you can use this as a sort of go-to meal when you don't have any other ideas. Curry paste is good in the fridge for about 2 years. It's really versatile and I bet would be great with other veggie combos, just be creative and use what you have on hand!

Pin It!